Monday, September 12, 2016

Nuke 10 Impressions


The Foundry's Nuke Studio has a well clenched grasp in the post-production market, and more specifically, the compositing business. Nuke has the reputation of a flawless node-based workflow, efficient and effective composing tools, and a vast plug-in library. After digging deeper into Nuke and its processes, it is not hard to understand why there is so much success behind The Foundry's flagship program.

User Interface

As a relatively new user to Nuke Studio (6 months experience), I find the "learning curve" to be welcoming to users if they have had experience with prior node-based compositing programs such as Autodesk's Flame, or Blackmagic Fusion 8. Nuke has a sleek and simple approach to its interface.


Accessing color channels, layer channels, and gamma settings are arranged in a stress free manner, and provide essential information for all compositing tasks. The dope sheet is a separate tab under the viewer, that displays the keyframes for any node opened in the project window. 

If I had one immediate criticism, it would be the curve editor. I find it sloppy and difficult to edit compared to the curve editor in Adobe After Effects. I admit, I'm not a curve editor pro, but I should not have to be engaged in a guessing game with the curve editor.

Nodes

I am impressed by the nodes in Nuke. Blackmagic Fusion was and is a great compositing piece of software, but my biggest complaint were properly setting up alpha, depth, and other passes. To create these passes, I would have to combine different channel nodes with color nodes, and then link the passes back up with a channel node. In Nuke, it is as simple as using a channel node. I do suggest exporting a single EXR image file and separating the passes that way. If not, you have to combine the passes, and create layer passes for each pass. It is simply a lot of busy work.

Lightwraps are simple within Nuke; it's just one node function, again. In Fusion, the alpha pass has to be blurred, and then processed through another channel pass, followed up with an erode node. Nuke supplies all of the work into one responsive node.


I have to give a shout-out to the exceptional tracking nodes, and the 3D scene integration nodes. The 3D scene nodes are supplied by Nuke, and the user simply needs to plug in the necessary nodes into the required pipeline.

Speed and Performance

Nuke can have all of the bells and whistles of a great interface, but all of that is useless if the program crashes more often than not. Good news, Nuke is a performance powerhouse. Over the time of six months, I can count on one hand the times I encountered a crash. Node effects are almost immediate, and edits are visible in real-time.

Performance begins to hinder when 3D objects are inserted into 3D scenes with lighting and textures. The same can be said with a highly-composited scene with rotobrushes, masks, composited objects, and tracked shots. This is standard for most compositing packages, except Flame; which is the software's selling point. To help speed up previews, double check node settings and apply low quality effects until the sequence is ready to be rendered.

Judgement

Nuke is a powerful well-received compositing piece of software. I find myself discussing Nuke and its features whenever possible. Only having six months experience, I know I barely scratched the surface; I look forward to exploring particle simulation and stereoscopic compositing. I am looking forward to the future with Nuke, and uncovering other software packages offered by The Foundry.

Monday, September 5, 2016

Behind The Project: "Baggage"


Baggage was a culmination of a number of variables that affected me both professionally and personally. Almost a year after graduating college, I was/am still living at home attempting to find full-time employment either as a motion graphics artist, or compositor. I had to create a visual entity that built upon and showcased the skills I have in both fields. I did not strictly want a technical showcase. I wanted to tell a story. Personally, I feel as if the past year and a half has been a difficult time. I adjusted to no longer being in college, looking for full-time work has created doubt of whether I am qualified to be in this industry, and I am still not completely over the romantic relationship that ended a little over a year ago. 

Baggage. That is what this past year and a half has spawned. Baggage was a method for me to release my own baggage, and I hope the same can be said for the audience.


Introduction Sequence


The inspiration behind the intro sequence are neon lights, and the earth's sun. I am captivated by the colors of the sun and sky in the early morning, and late evening. The camera movements of the animation are relatively simple. I know my personal weakness in motion graphics are my camera manipulations. My goal was to build upon the skills I currently have, and work on my weaknesses in a later project. I did play with the focus distance and aperture within the camera settings during the animation. There is a sense of chaoticness because of the inability for the camera to focus for a long duration. 

The background is a mixture of a prior animation I was creating, and a series of metal textures. I have a tendency to clutter my motion graphic pieces. The background had to balance the work by appearing simple: while also having a strong presence via a textured color-filled surface.

I included the environment video to help ease the audience into the video transition. Jumping to the main video sequence would be too jarring, and this was a way to add cushion to the impact. 

Video Breakdown


The live-action video sequence is broken up into two parts: the shots inside of the car, and shots outside of the vehicle. Inside the vehicle, the camera was positioned into the backseat and had a slight foreground blur. All these shots were composited in an almost identical way. The footage was color-corrected and stabalized. 2D tracking was done for the dust particles, time on the clock, and window reflections were added to these shots. The last cut before driving into the woods had a stoplight and additional signs in the background roto'd out of the scene. A subtle additional lens flare was implanted into the shots, and other additional lighting elements for enhanced mood were composited into the scenes as well.


While driving into the wooded area, the sky was replaced, and the windshield had dirt particles that affected the aesthetics of the shot. I roto'd those dirt particles, and continued the previously mentioned composited sequence. The compositing was meant to compliment the shots, not overtake and distract from the story. Subtly was the motto.

The shots outside the vehicle had similar elements composited within each shot. The first shot outside the car had 3D objects composited, and a slight alter to the sky in the background. Throughout the following shots are green firefly like particles that give a fairy tale atmosphere to the seemingly realistic environment. Shots that involve a kinetic camera were 3D tracked and produced a great result for the particles. I was able to achieve a sense of depth of the particles. The finishing touches to the shots were composited yellow/orange lights, and when appropriate, lens flares. At first, these alterations may go unnoticed, but these edits inflate the ambience of the environment.


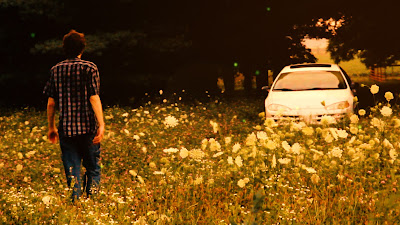
The shot with the most compositing, and a clear representation of a balance between pure natural elements with a conservative, yet effective compositing is the shot of the actor walking toward the vehicle. The framing of the shot follows the "rule of thirds" and incorporates beautiful wild flowers. I began by color-correcting and stabilizing the footage. I made a slight adjustment to the trees around the car by roto-brushing the spacial gaps of the branches. I tracked and composited a wind turbine in the background to fill in the empty space, and the vehicle although well lit, and in a superb position, lacked a visual punch. I included a reflection to the windshield and a slight color-correction to the car body. 

I wanted this shot to be the visual climax of the video. I doubled and even tripled the amount of particles I used for some of the prior shots. I increased the velocity and movement of the particles to correlate with the idea that the character is in a "spiritual wind tunnel". He just threw away his baggage and is ready to move on with his life, and is therefore being cleansed.


"Baggage" VFX Breakdown


The camera transitions to another shot into the inside of the vehicle, where the audience was not too long ago to conceptualize that even if we make a drastic life decision, we still find ourselves where we were not long before. I did the same procedure for the shots inside the vehicle, but I roto'd a few objects out of the shots. The first two quick cuts I roto'd an old house out on the left side of the road, and the last shot I removed the telephone pole and power lines along with some trees in the background near the telephone pole.

A Reflect Back


As I watched and reviewed this past video project, I would have made a few adjustments. Some shots lasted too long, and at points because of this, the flow of the video became slow. Working on the VFX breakdown video, I should have made more prominent compositing alterations to the footage. I did not want to force compositing just to composite, but there were opportunities to showcase what I can do as a compositor.